

Are you beginner for ESP8266? if yes this tutorial will help how to flash NodeMCU firmware to ESP8266. It's very simple. Before learn how flash the firmware to ESP8266, you need a firmware of ESP. It may be AT, NodeMCU or other. Here used to demonstrate with NodeMCU firmware. Do you know How to Build a NodeMCU firmware for ESP8266?, if yes good and don't know please see this.
Getting Started with NodeMCU flasher tool
NodeMCU flasher is a firmware programmer for NodeMCU DEVKIT V0.9. Can use it to program NodeMCU DEVKIT or your own ESP8266 board. MUST set GPIO0 to LOW before programming, and NodeMCU DEVKIT V0.9 will do it automatically. This is demo version. It will be cross platform and open source.First Watch Video
Required Hardware
- 1x ESP8266 Any Module( Used Ai-Thinkers ESP-12F)
- 1xESP8266 Programmer (FDTI chip or use your Arduino board)
- 1xWindows Machine (32 or 64 bit)
- Wires
Required Software and Tools
- NodeMCU firmware (See this - Used NodeMCU Firmware)

- Download NodeMCU Flasher
Connections:
ESP8266 chip - FDTI Programmer
Vcc - 3.3v
Gnd - Gnd
TX - Rx
Rx - Tx
Connection Diagram
- will update soon
Follow steps
- Connect all connections as per mention in the connections (GIPO-0 Must be low or Pull Down mode) in ESP8266 refer the Below Image

- Open NodeMCU Firmware Programmer(ESP8266Flasher) Tool
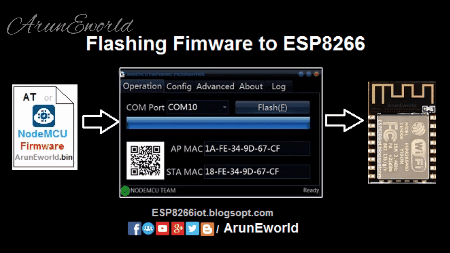
- Connect Programmer to USB port (Note : Once connected correct COM port ESP8266 Flasher tool auto detect and shows connected COM port in Operation section)
- Select correct "COM Port" at Operation Section
- Add a "firmware.bin" file using gear icon at config tab section (use Offset value as 0x00000)
- Click "Flash Button" in Operation Section (Just click flash and you can burn firmware to ESP8266, Before you doing it, GPIO0 MUST LOW.) Note : Once connected NodeMCU firmware tool with ESP8266 you can see QR code of the AP MAC Address and STA MAC Address. Also you can see the status of upload.
- After Complete Flash you will see like following image
Done. Thank you !
FQA
Troubleshooting
Q : "connecting GPIO " error
- Please check your ESP8266 with programmer connections
- Check your COM port at Device manager
Q : require ("nodemcu")
- Its not a error, just a Introduction caption label.
Q : require ("wifi")
- Its not a error, just a Introduction caption label.
Q : require ("gpio")
- Its not a error, just a Introduction caption label.
Q : connect.world()
- Its not a error, just a Introduction caption label.
Q : file not exist
- When the path have some error.(the line will become red.)
No comments:
Post a Comment