ESP8266 is a small Micro controller with inbuilt WiFi and it is a more powerful then a arduino. three more way to program and flash firmware to ESP8266. Mostly using CP2102 USB-TTL UART or PL2303 USB-TTL programmer. But you can also use your arduino board as a ESP8266 Programmer (like a other Programmer). if you very familiar in flash the programs in controllers then, this tutorial is not help you..Just use your arduino Board as a ESP8266 Programmer..No nedd FDTI chip or other programmer.
Watch this Video first
Required Hardware Component
- 1x ESP8266 Any Module( Used Ai-Thingers ESP-12F)
- Arduino Uno Board - Any Version(*Try Another Arduino Board)
- USB Cable to Arduino Board
- Wires
Required Software and Tools
- Windows or Linux System
- Arduino IDE (or) ESPlorer IDE (or) Lua Loader
- 5Nos Wires
Steps for flash firmware
- Remove Atmega320P chip or other At-mega IC
- ESP8266 chip GPIO-0 pin should be low (Program Mode-Flash firware)
- Check Enabled Ardiuno COM port in Device Manager
- Open ESP8266 Flasher tool
- Select "Config"
- Upload your firmware
- Select Operation (When firmware upload is finish to flash tool)
- Click "Flash" (When Flash mode GPIO 10 is Blinging in ESP8266)
Steps for Upload Code to ESP8266
- Remove Atmega320P chip or other At-mega IC
- ESP8266 chip GPIO-0 pin may High or Open (Normal Mode)
- Check Enabled Ardiuno COM port in Device Manager
- Open ESPlorer Tool
- Set 115200 Baud Rate and click Open
- Upload Your Code
Connection
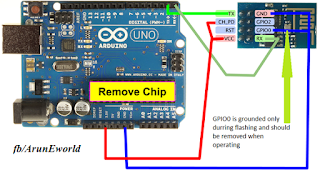
- Refer the above diagram and connect your ESP8266(Ai-Thingers) module with arduino board.
- But one thing is important " You must remove the "Atmega IC".
- because we only using that board as a programmer, Otherwise Binary files also upload in your arduino Atmega IC". This is very simple
How to flash firmware to esp8266 chip???
- once check assigned COM port of USB in Device manager.
- If you know COM port Directly set that COM port to ESP8266 Port
See Also
- How Flash nodemcu firmware to ESP8266?
- How Build NodeMCU Custom Firmware to ESP8266 ?
- How to Re flash AT firmware to ESP8266 (ESP-01,ESP-07, ESP-12, ESP-12E, ESP-14)
Links
Web : ESP8266IoTFacebook : ESP8266 Internet Of Things
Google+ : ESP8266
YouTube : ESP8266- YouTube


No comments:
Post a Comment